Revell HMCS Snowberry Flower Class Corvette
This is the eleventh part of the Revell HMCS Snowberry Flower Class Corvette 1/144 Scale RVG 05132
Well, it’s officially April, we’re into spring, and soon (hopefully) the weather will warm up, and most of our modeling time will be devoted to the outdoors. Free from the shackles of winter. It’s also April Fools today, and though this is the time for pranks and practical jokes, I’d like to talk for a bit about something you’d be foolish not to have in your modeling arsenal: Mr. Cement SP.

Mr Cement SP (Special Power) is a fantastic product that has undoubtedly been the hero of this build. As far as thinned cement goes, it is a fast-acting cement that bonds the styrene together quickly, allowing the modeler to work faster. It is very similar to Tamiya Extra Thin Cement -Quick Setting-, and it’s just a matter of preference as to which brand you’d prefer.
I know a lot of modelers like the standard thinned cements, and I can’t argue with that. I still used Mr Cement S several times on this project, but I can’t beat the speedy results of Mr Cement SP.

In this post, I’m going to be building the bridge. This section of the ship was opened and exposed to the elements. I’m starting by adding these squared sections to the side of the outer railing. I couldn’t find out what these are exactly, but from what I could see from HMCS Snowberry, this was canvas or plastic around the railing, and these squares were padded.
This is also the correct way to set up these squares. The instructions have them posed the same as the first 2, but there aren’t enough to have them all in this position.

Next, I built the ship’s radar tower. This section will fit on the back of the bridge. I masked off the clear parts with Tamiya 1.0mm tape and painted the frames with Tamiya XF-1 Flat Black. The clear parts for this piece are really not the best; very grainy and poorly molded. There is a radar dish that is supposed to go inside, but since the clarity was so bad, I decided to just leave it out.
The railing was tricky, and I worked slowly, attaching each section. Mr Cement SP greatly assisted in fusing the rails to the platform. Though the railing was a bit tricky, this was a satisfying little section to build, and once everything had dried, I glued the tower to the bridge.

Some of the first details to be added were the binnacle, voice pipes and alidade. To add a bit of color, I decided to paint brass sections with AK Interactive Gold AK 11191, and then to dirty them up, I applied a generous layer of Citadel Nuln Oil 24-14.

The bridge’s forward cabin and the other walls were then added. The forward cabin needed a bit of help to get into place, and to solve this, I used a squared metal file to quickly remove some of the excess plastic.
You might have spotted that small square on the front of the cabin. This was a clear window that I glued on and covered with some tape.

Now, it was time to add on the outer railing sections. At this stage, I ran into a few fit issues. I can’t tell you why exactly, and I’d rather blame myself here than Revell, but I think some of the sections might be too small to go around the platform properly.
But with some careful patience, I was able to get everything glued and secured.

Before I painted the anit-ancraft (AA) guns, I carefully carved out the plastic at the back of the gun. This was to create the shoulder rests and help add a bit of accuracy to these parts. The AA gun, as well as the spot lights you see behind it, were painted with XF-1 Flat Black.
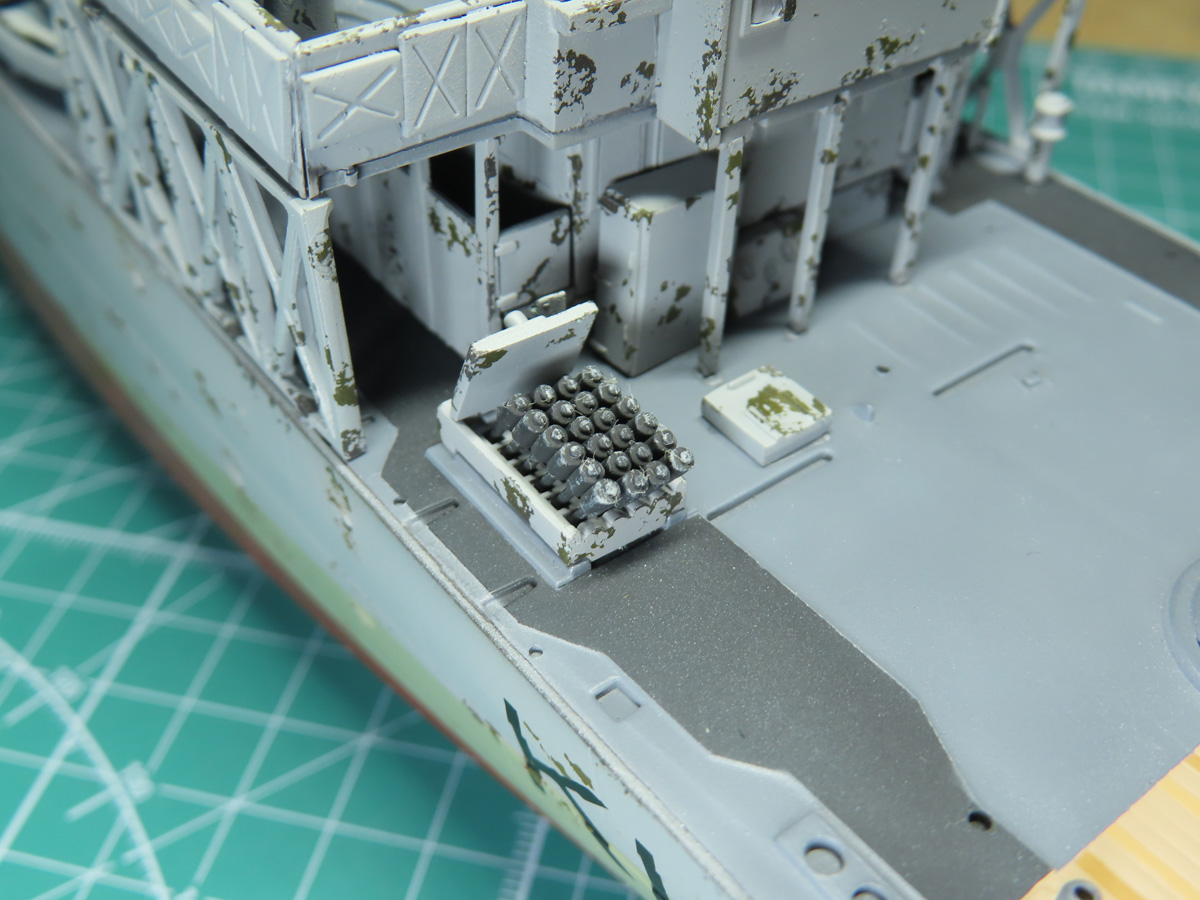
I had fun adding on this Hedgehog launcher. I painted the hedgehogs with Tamiya XF-85 Rubber Black and drybrushed over the parts with some light grey to highlight the details.
I used The Army Painter Drybrush BR7015, and I have to admit I’m not that thrilled with this particular brush as you can see from this picture it leaves bits of hair behind. This will easily be dusted off once the paint has fully dried. I’d suggest investing in the new softer rounded drybrushes from Army Painter or Vallejo.
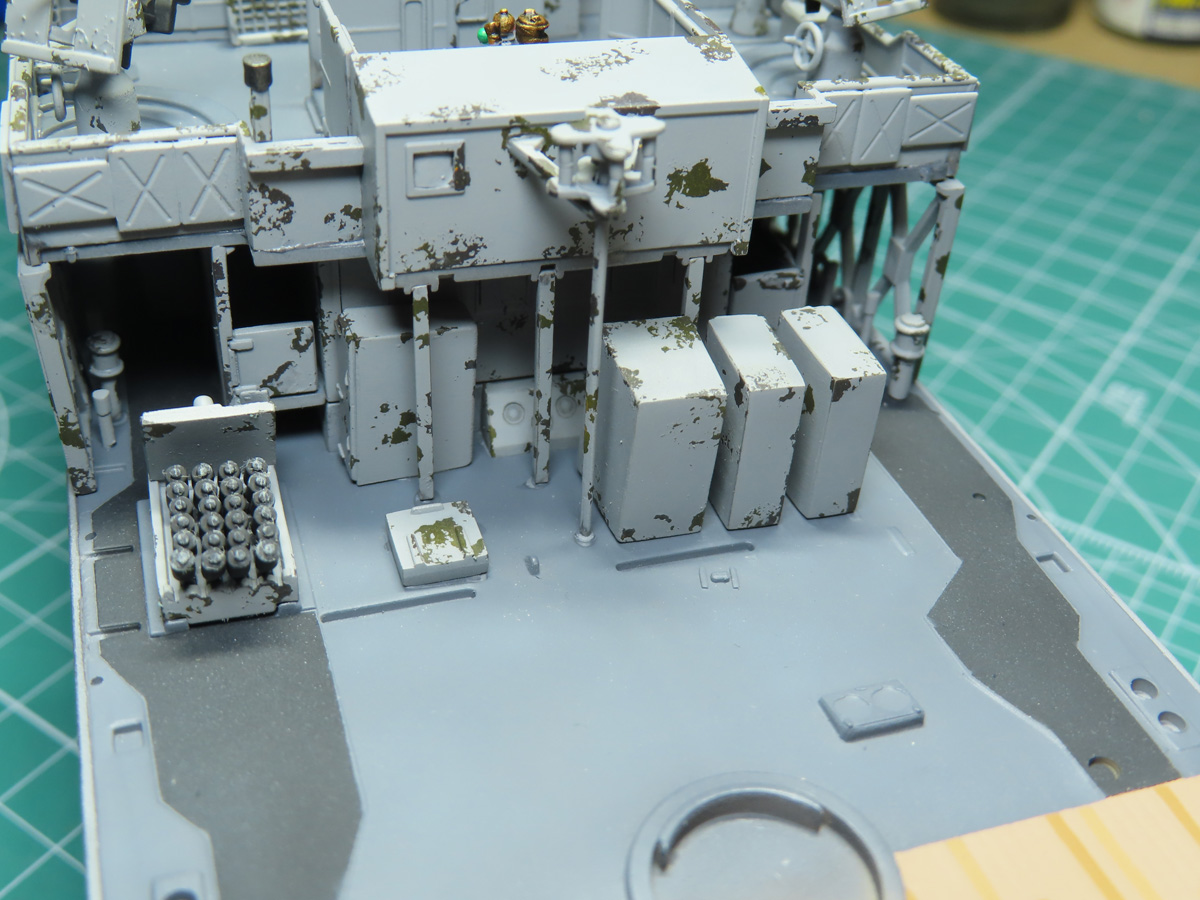
Three more storage lockers were added, as well as what I think is either a weather vane or antenna to the front of the bridge.
Pay attention at this stage to the position of the storage lockers, as there is a wall that will go in behind them, and you need to have the lockers forward enough not to interfere with that part.

The wall fit snug into grooves on the deck, and the side of the wall was quickly added to get the angle in the correct position. Lastly, I added on the small crane that fits in front.
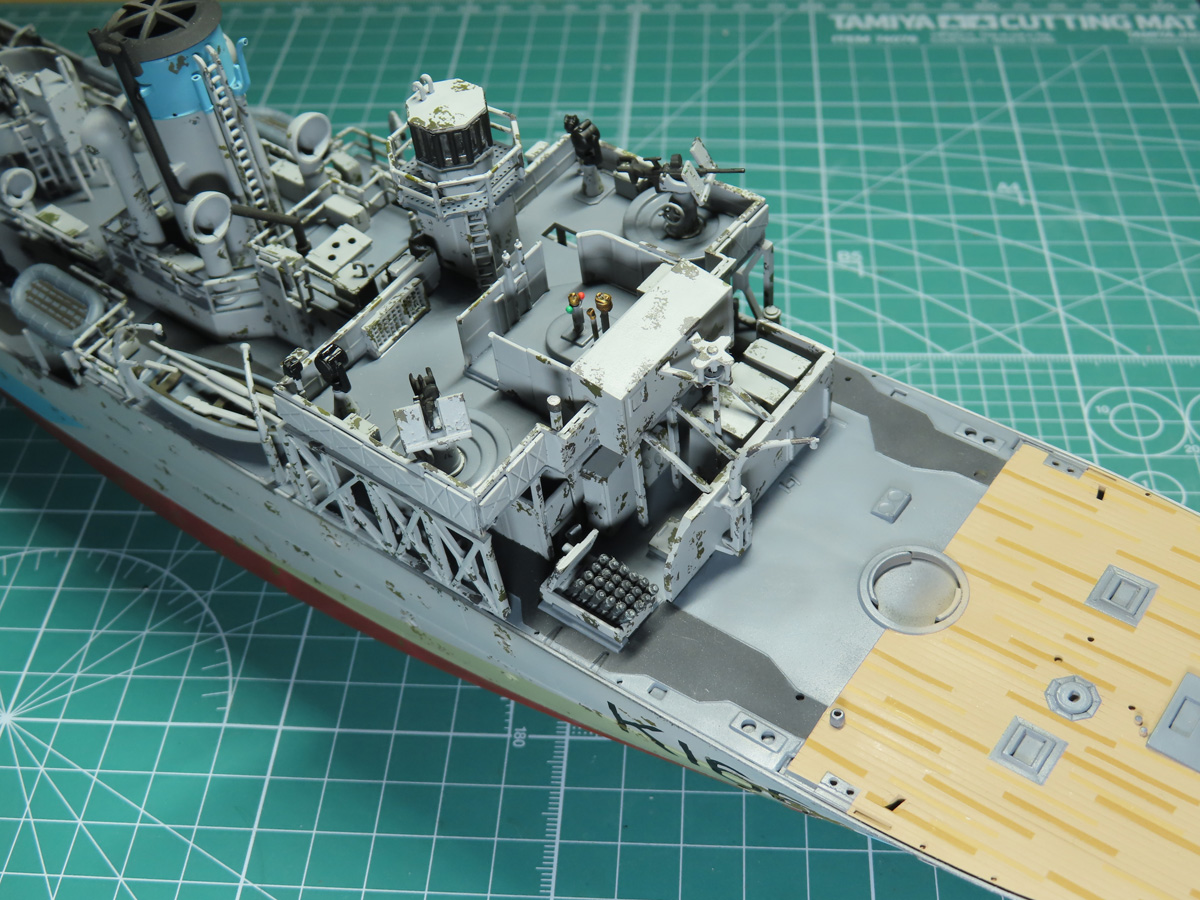
This almost completes the bridge section. There are some thin, clear windows that will run along the edge, and I’ve decided to leave these off until the build is complete. This way I won’t have to mask them off and they are still easy to add on to the completed model.
And to my surprise, I’m almost done with this ship. There isn’t that much left to build now; it’s mostly the main deck gun and more small details. Plus the rigging, and that could take some time to do properly.
Yeah, not too much more now and soon we’ll be ready to set the Snowberry out to sea!
To be continued…
Jared Demes is a modeler from southern Alberta. He has been building models since he was 4 years old when his Dad first introduced him to the hobby. He has written for several magazines including, Fine Scale Modeler, Scale Aircraft Modeling, Phoenix Scale Models, and others. He has an interest in all modeling subjects, with a focus on WWII Japanese aircraft and Science Fiction.
Jared has won several IPMS awards for his modeling, and currently operates his YouTube channel rebelsatcloudnine, where he showcases model builds and product demonstrations.
First Post: Part 1
Previous Post: Part 10
Next Post: Part 12