
Skill Level: Experienced – Advanced
Read Time: 10 minutes
AFV, Aircraft and Marine Vessel Protective Clear Coat Strategies Part №.1
Understanding Paint Types: Lacquer, Enamel and Water-Based Acrylics 101
Classes: ◦ Gloss ◦ Semi-Gloss ◦ Satin ◦ Flat ◦ Dull ◦ Ultra Matte
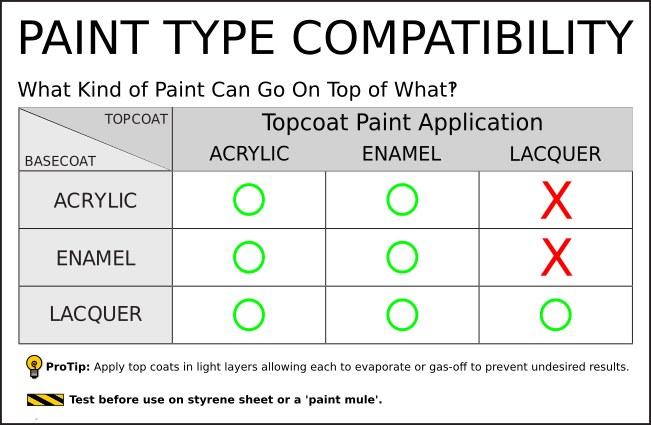
A previously applied lacquer finish reactivates with another fresh, top coat of lacquer, even after it has dried and cured, accepting the new coat to merge and become one layer of paint, an excitable medium. Enamels will fuse to the previous coat, providing it is tacky and fresh. Otherwise, it is another layer of paint covering the last. Water-based acrylics form layers of paint adhesion, like a layer cake, each layer separate from the other, sticking in place, never mechanically bonding like enamel or lacquer. Of all the protective clear coats, lacquer is the strongest, followed by enamel, water-based acrylics, and polyurethanes.
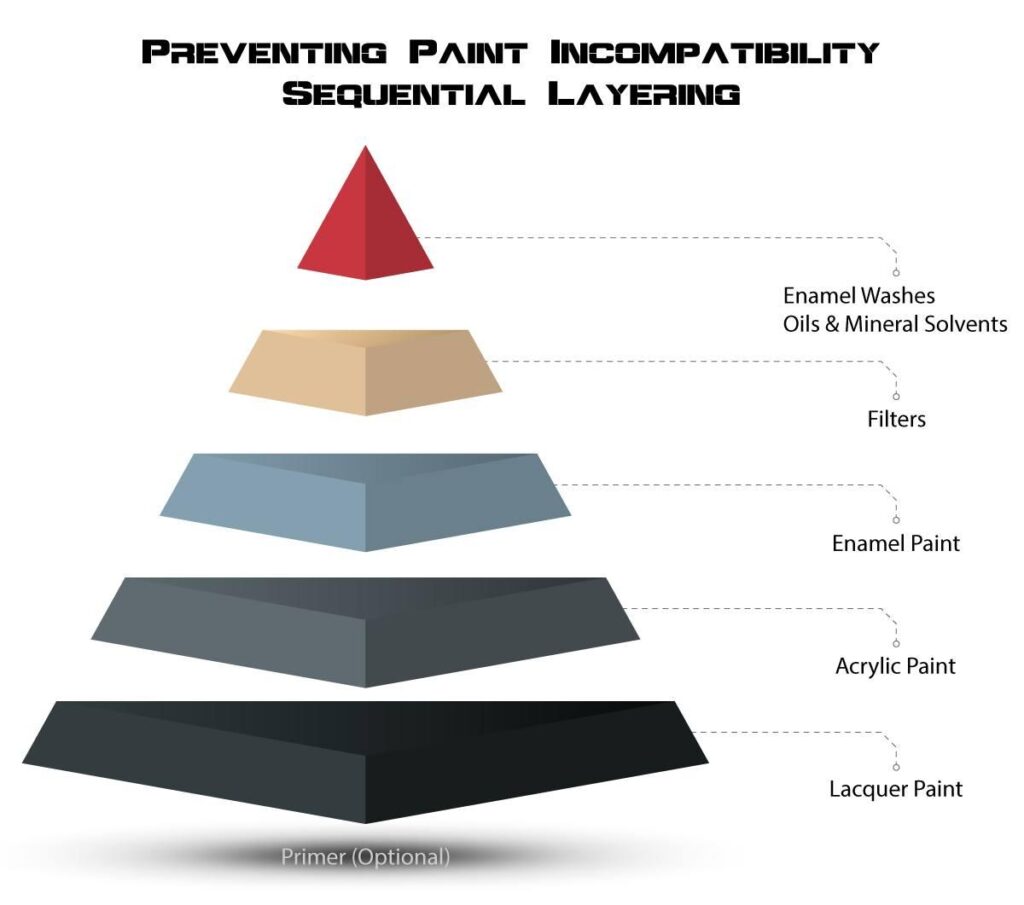
The substrate paint and subsequent top layers must be compatible before a protective clear coat is applied to lock in a particular technique. This article explores what needs to be done and prepared for before commencing.
Less is more, and patience is a virtue. Every new layer must be permitted to be fully cured before proceeding with the next step.
Lacquer Solvents Eat Paint
⚠️ Lacquer products and solvent-based clear coats, including 1K, 2K and Ceramic Varnish (Super Gloss), including their thinners, eat paint—dissolve it. The solvents used in lacquer products are “hot,” meaning they have the potential to semi-liquefy enamel and water-based acrylic paint when applied to them. 🤔
🚧 Use only plastic-friendly hobby thinners applicable to the brand in use. Mixing thinners from different companies may result in disastrous results and a plugged airbrush.
🚫 No Commercial Solvents
Off-the-shelf hardware and Automotive Paint Thinners, such as Spraygun Lacquer Thinner, GUN WASH, MEK, Toluene, Acetone, Turpentine, etc., are “hot” with “teeth” that soften and dissolve kit styrene on contact. Not only can they ruin your build, but they will instantly solvate any paint they come in contact with, ruining your hard work.
Paint the Land of Confusion
The clear waters of distinction quickly become murky regarding paint types, whether water-based, water-soluble, or solvent-based.
Rule of Thumb: Brand Ecosystem
When one brand type of paint is used, complications other than application and thinning are minimized. When two or more paint types are used, compatibility risks increase proportionately. Solvent types and solvent heat, in other words, the ability to dissolve, are two of the main culprits of failed paint jobs. The wrong solvent applied over water-based or enamel paint may ruin the surface by dissolving the paint and destroying the finish. Water-based acrylics and enamels do not reactivate, compared to lacquers. Using incorrect paint, such as solvent-based lacquer, on top of them runs the risk of the solvent destroying the underlying paint.
The Exception to the Rule – Skating On Thin Ice
Lacquer may be carefully applied over enamel, providing the enamel has outgassed and cured sufficiently. For example, lacquer metallic paints, applied in light coats, flash off immediately without enough time for the solvent to dissolve the underlying coat other than bonding. By comparison, laying down a heavy wet coat of lacquer paint increases the probability of ruining the underlying enamel paint by partially dissolving it. Heavy lacquer coats sitting on the enamel figuratively burn, destroying the underlying surface. Improperly thinned lacquers result in altered chemistry and undesirable consequences.
Thinning modelling lacquer paint with hardware store lacquer thinners increases solvent temperature and solubility aggressiveness, contributing to the destruction of non-lacquer paint.
Best Practices
- Use proprietary thinners for the best paint chemistry results
- Know the paint types
- Don’t mix paint brands
- Use one paint brand
- Test twice, paint once
💡 🤔 Ask someone in the know and whom you trust if you are uncertain.
Paint Type Confusion
Paints are a land of confusion at best. Acrylic is a ubiquitous term to describe paint. The best rule for success is to find a paint brand you like and stay with it, avoiding temptations to mix and match. For those more daring of heart, success is contingent upon knowing what paints are what and their differences.
Different Chemistries
- Water-based acrylics are like plastic surface skin and are susceptible to peeling off.
- Enamels are acrylic, alkyd-resin-based, mineral solvent (petroleum distillate) paints that stick to plastic.
- Lacquers are alcohol-solvent-based, reactivatable paints that bite (dissolve) into styrene, producing an excellent bond.
- Lacquer-painted surfaces reactivate and are reworkable. Water-based Acrylics and Enamels are fixed and unalterable.
- Water-based, emulsified Acrylics (in suspension), dry through evaporation and polymerize (connect together) forming a plastic or latex skin on the surface.
- Enamel Paints dry by oxidation and outgassing, curing into a hard, durable surface.
- Lacquer Paints off-gas with the dissolved acrylic polymer bonding to the styrene surface.
Dry paint is not the same as cured paint.
Locking in Weathering Effects and Protecting Previous Steps
To apply clear coats between weathering effects on models, follow these steps:
- Choose the appropriate clear coat: Select one compatible with the weathering effects you have applied and the type of model material you are working with.
- Test on a scrap piece: Before applying the clear coat to your model, test it on a scrap piece of the same material to ensure compatibility and to see how it affects the weathering effects.
- Apply the clear coat: Once you are confident in your choice of clear coat, apply it evenly over the areas where you have applied the weathering effects. Use thin, even coats to avoid obscuring the weathering but still provide protection.
- Allow drying time: According to the manufacturer’s instructions, let the clear coat dry completely. This usually takes a few hours, but patience is important to avoid smudging or ruining the weathering effects.
- Assess and reapply if necessary: After the clear coat has dried, assess the model to see if the weathering effects are adequately protected. If needed, apply additional coats of clear coat for more protection.
By following these steps, you can effectively protect the weathering effects on your models with clear coats.
Dull Coats
The primary distinction between a gloss finish and a matte finish resides in their visual attributes and light interaction. A gloss finish is recognized for its pronounced shine and reflective properties, resulting in a sleek and lustrous surface that actively mirrors light, thereby producing a radiant and polished appearance. Conversely, a matte finish presents a non-reflective, flat visual aspect with a subtle texture that disperses light, yielding a more understated and velvety visual impact.
Fundamentally, the differentiation is rooted in the degree of shine, reflectivity, and surface texture. Gloss finishes offer a striking reflective characteristic, while matte finishes deliver a subdued, non-reflective presence alongside a distinct tactile quality.
When using an airbrush, paint atomization occurs as the paint is transformed into minuscule particles and particulate matter and released as a mist. This method is critical for achieving a uniform and detailed finish in airbrush painting. The precise adjustment of air pressure, paint viscosity, and the distance between the airbrush and the painting surface is essential to achieve optimal paint atomization. Proficiency in this technique is paramount for attaining the desired results in airbrush painting.

Airbrush Vortex Paint Dust
Turbulent Confused Airdflow Compounded by Obtuse Angles
When using an airbrush, the process of creating a vortex can generate paint dust. This is particularly common when working with certain types of paint or if the airbrush is not being used correctly. To minimize the production of paint dust, it’s crucial to operate the airbrush in a well-ventilated area and follow safety protocols. Furthermore, using the appropriate paint consistency and employing proper airbrush techniques can significantly reduce the amount of paint dust being generated.
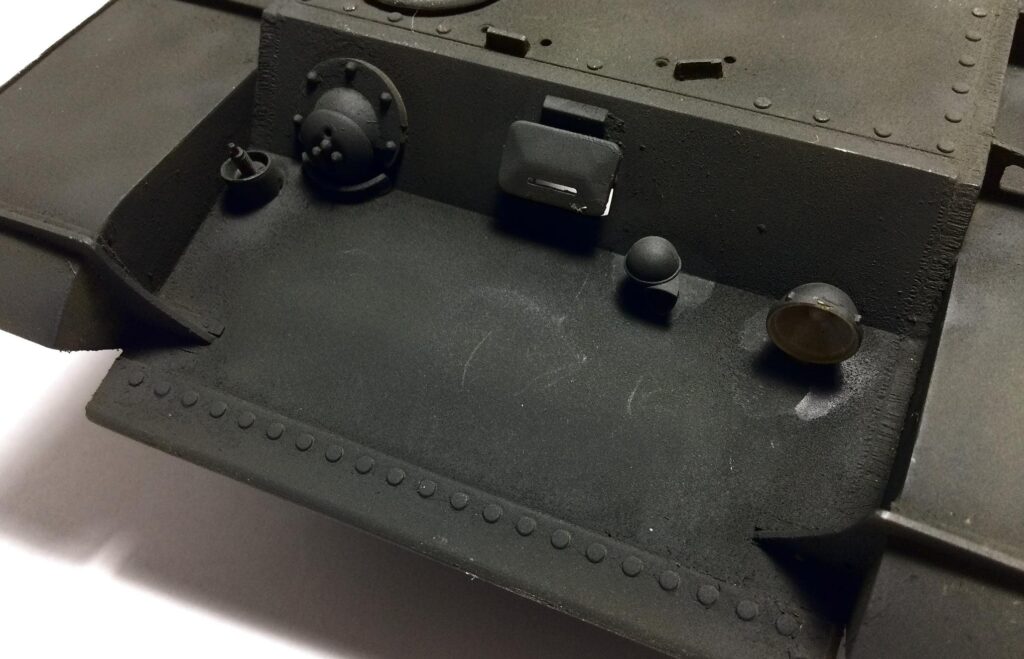
An airbrush vortex has you painted into a corner, literally. The result is unwanted paint dust accumulation. Instead of settling down on the surface, atomized paint particles swirl around, caught in a tornado, in this case, an airbrush vortex of spinning air created by angles the airflow is coming in contact with and deflecting.
When light coats of paint are applied, accumulated paint dust is easily eliminated by either a soft brush or a layer of REAL COLORS THINNER, TAMIYA LACQUER THINNER, MR.COLOR THINNERS, or a combination of both techniques. Lacquer dust reactivates with the thinner to dissolve and become one with the surface.
Paint dust interferes with any future weathering effects. The pictures are before and after.

______________________________________________________
The flame cut marks on the hull side plate edges are created by lightly dragging them across № 80-grit sandpaper.
Airbrush Splatter Sputter Source
Forgotten to stop the paint flow first before stopping airflow‽ When we are airbrushing, it is easy to simply release the trigger when we are done. In doing so, we create a problem for ourselves… paint remains in the nozzle chamber. When airflow resumes, residual paint in the chamber will splatter before the paint flows. If this happens over our work, then we have another problem: paint blobs. As a precaution, always test the spray pattern before resuming and get into the habit of triggering the air first, then paint before moving over the workpiece.
The best airbrush practice is to keep the airflow on continuously, stopping paint flow first away from the workpiece and allowing the air to exhaust any remaining paint in the nozzle chamber before stopping airflow.
Pooled leftover paint drying in this reservoir will cause reduced airflow, creating more splatter in the process or plugging the airbrush completely.

Lacquer Thinners
The internet abounds with misinformation and improper product use. Paint manufacturers muddy the waters with marketing terms.
When is Lacquer Thinner, not Lacquer Thinner?
Manufacturer’s syntax-semantics add to the confusion. One excellent example is TAMIYA LACQUER THINNER and LACQUER THINNER. Both products identify themselves as LACQUER THINNER but are worlds apart in chemical composition. One is styrene-safe; the other dissolves styrene.
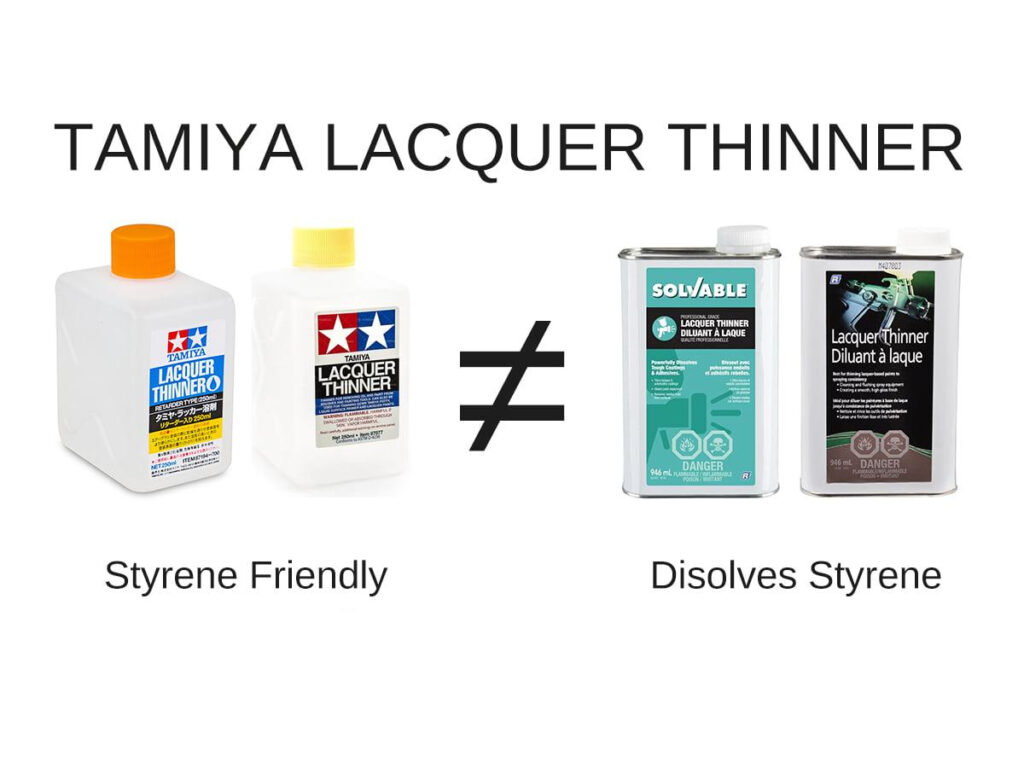
TAMIYA LACQUER THINNER (Yellow Cap 🟨) can quickly and easily strip a botched paint job. A few drops worked in with a paintbrush, and the job is done… voilà!
Our hobby paints are full of confusing terminologies. Understanding our paints and knowing what works with what is important for best results. Paints and thinners are not mix and match.
Although different in chemistry, Mr.COLOR THINNER (Yellow/Blue Label) is similar to TAMIYA LACQUER THINNER.
LACQUER THINNER will clean acrylic lacquer paint (TAMIYA/REAL COLORS/Mr.COLOR/ALCLAD II etc.) from an airbrush. However, it may adversely react to water-based acrylic paint and plug the airbrush. Always test before use. Use a compatible airbrush cleaner.
In Protective Clear Coats Part №.2, Clear Coat Protective Layering is examined, along with the pitfalls and how to fix them.
James Wooldridge is An enthusiastic scale modeller, researcher, amateur historian, and contributor to scale modelling sites, including Scalemates. He is an active and progressive Facebook Group Expert, Presenter, and Scale Modelling Club Video Host. James is also the Executive founding member and KSM Group Expert – Kawartha Lakes Scale Modellers