
Airfix Avro Vulcan B.2 Black Buck
This is the second part of the Airfix Avro Vulcan B.2 Black Buck 1/72 Scale A12013 build and review.
Airfix 1:72 Avro Vulcan B.2 “Black Buck” (Part 2)
I’ve been building models since I was about 4-5 years old. Most of these projects were me assisting my Dad, but as I got older I built a few models on my own. These were pretty poor models that probably should have been tossed out, but it started a hobby that to this day I still enjoy.
However, when I was about 10 or 11 my Dad gifted me an Airfix 1:72 Spitfire Mk I. And that was the first time that I really took scale modeling more seriously. I was determined to have the same paints as were listed in the instructions and it also started my fandom for the Airfix brand. If it wasn’t a red circle with Airfix on it, I really didn’t care, and soon I had entire shelves dedicated to Airfix models.
Looking back that youthful exuberance I once had for Airfix has been replaced by other brands, but I still can’t help but get nostalgic every time I open up an Airfix kit.

Starting off this build we begin building the cockpit interior. Here is the cockpit floor, there is an opening in the floor for access to the aircraft as well for the bomb aimer to climb through to the forward nose section. I was pleased with the amount of detail in this section, especially at this scale.
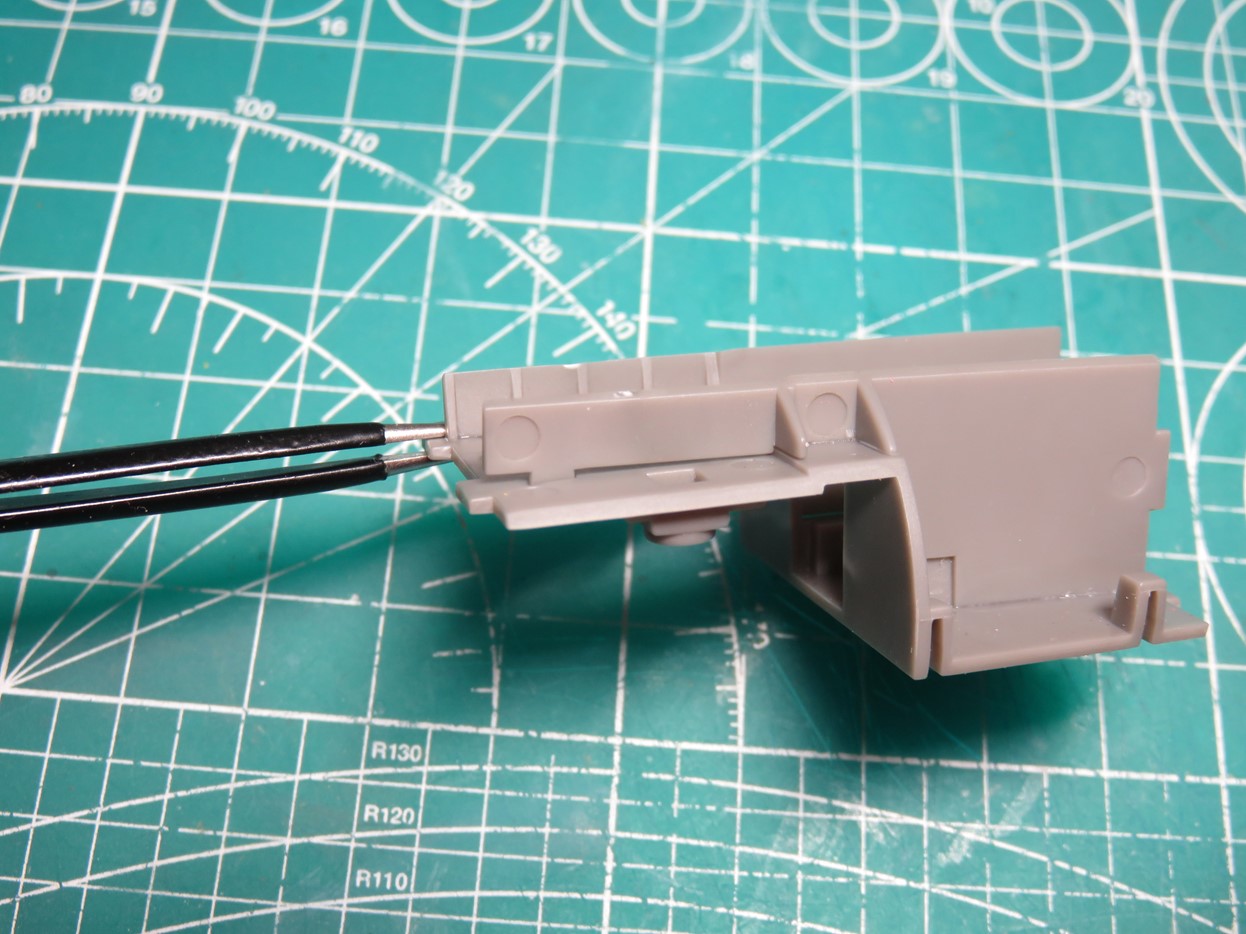
Here the floor is flipped upside down and I’ve begun gluing on the side wall sections. Unfortunately, I’ve discovered some warping with the cockpit floor so the side wall doesn’t fit properly. However, this is a very easy fix.
To start I glued the side wall to the floor, but I only glued on the right side of the parts.
I used Mr Hobby, Mr Cement SP (the purple cap (the SP stands for “Special Power)) The Special Power is that it’s a much more aggressive cement, and it dries a lot faster than the standard Mr Cement S. This is my preferred cement, but it can be a bit too bold to some modelers, that being said it’s fast acting bonding really helps me build faster.

Once the right side of the piece had dried thoroughly, I took an alligator clamp and pressed down on the gap. Then I filled it in with some more Mr. Cement SP.
Warped parts can really be a bother when you are building. From my experiences, I’ve found that it’s usually best to be patient and carefully analyze the best way to glue the parts together in smaller sections as I’ve demonstrated here. Of course, a lot of this will depend on the subject you are building.

I flipped the part around and installed the center throttle controls, as well as the foot pedals. You might notice the one-horse shoe-looking pedal, and this simply wasn’t filled in all the way when the styrene was shot into the mold.
I could have built this part with some styrene, but I decided against it as it wouldn’t be seen on the completed build. I will explain this further in the build.

And speaking of things that won’t be seen, I added some Tamiya Basic Putty with my spatula to cover some holes where pegs from the side walls fit.
I left the putty to dry overnight, it’s a Lacquer based putty so it dries pretty fast, and there is some shrinking. After it dried I sanded it smooth with my Vallejo Sanding Pads.

I added the bulkhead to the front of the cockpit floor, and the instrument panel to the top of the throttle control column.
I then painted the interior with Mr. Hobby Aqueous H-12 Flat Black. You will notice there is some overspray around the instrument panel, and this was Mr. Color 46 Clear. I added some gloss to these sections as a decal would be placed there further on.
The red extinguishers that are positioned behind the main seats were painted with AK Interactive Scarlet Red 11087. This is my first time using their Acrylics, and so far I think they are really excellent, and I’ll be adding more of these to my paint collection.
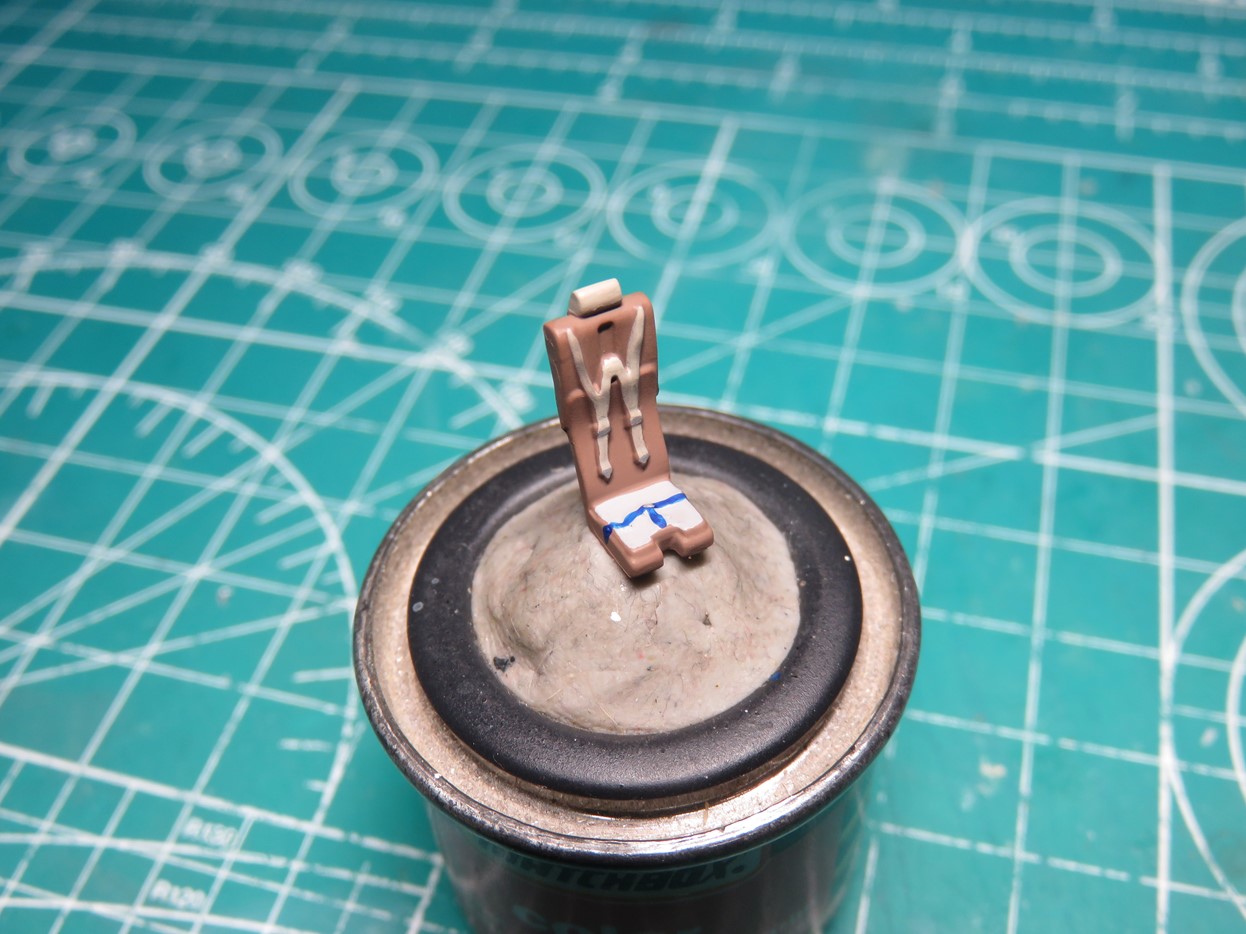
For the center section of the ejection seats for the pilot and copilot, I painted Tamiya XF-52 Flat Earth. The bottom cushion was painted with Tamiya XF-19 Sky Grey, and for the lower seat belts, I painted AK Interactive Imperial Blue 11180.
For the upper headrest and seat belts I painted XF-55 Deck Tan, with LP-11 Silver for the buckles.

I did a quick test fit of these seats to the cockpit and I discovered that the heads of the seats were too tall and when the canopy was placed on top it would bend the seats together.
This was another really simple fix, I took my sprue cutters and trimmed off the large tab that connected the seats to the floor. This time I was able to get the seats all the way to the bottom of the cockpit floor with plenty of space now for the canopy.

The decal for the instrument panel has a lot of detail. I really like how well these decals were printed, and I think they are going to look great when you see them through the tiny windows.
I used Tamiya Mark Fit Super Strong decal solvent to help the decals better conform to the surface. The decals reacted well to the solvent, and are now very tight to the surface.

I added the ejection seats to the floor, and with the pegs shortened the seats fit in a lot easier. There is a lot to paint on these seats, but they will still be visible through the canopy windows.

Next, it was time to add the seats in the back for the Air Electronics Officer (AEO), Tactical Navigator, and Radar Navigator. The two outer chairs could swivel around, while the center chair slid back and forth on rails.
For such a large aircraft it’s surprisingly cramped inside.
I painted these seats with Tamiya XF-71 Cockpit Green, and I then painted the cushions with XF-52 Flat Red. And the headrests were painted XF-19 Sky Grey.
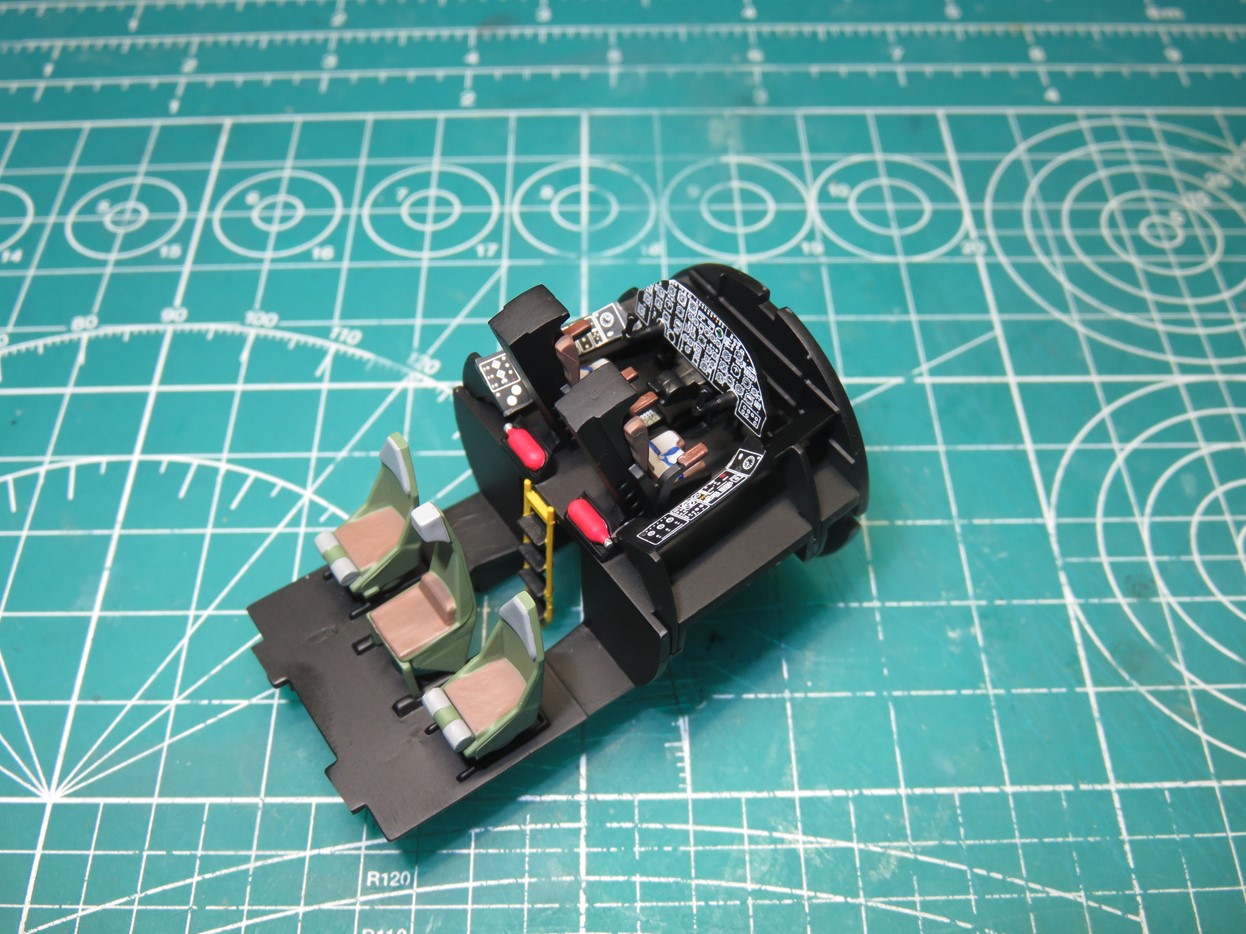
With all of the cockpit parts painted and glued in, minus the rear bulkhead that would have interfered with the pictures. I sprayed on a flat coat of Mr. Hobby Aqueous H-20 Flat Clear.

I mentioned earlier that the visibility in this particular model was very limited. I’ve temporarily taped the halves of the nose together so you can see how much will be visible. Keep in mind also that a canopy with 7 small windows still needs to go on top.
Now the clear parts are crystal clear, but there’s just no way of really seeing and appreciating all of the details that will be hidden inside of the model once things are sealed up.
I’ve toyed with the idea of adding a magnet to the canopy so that it can be removed and the details can still be seen, and this is possible. But it’s still difficult to see around with the general shape and design of the Vulcan.
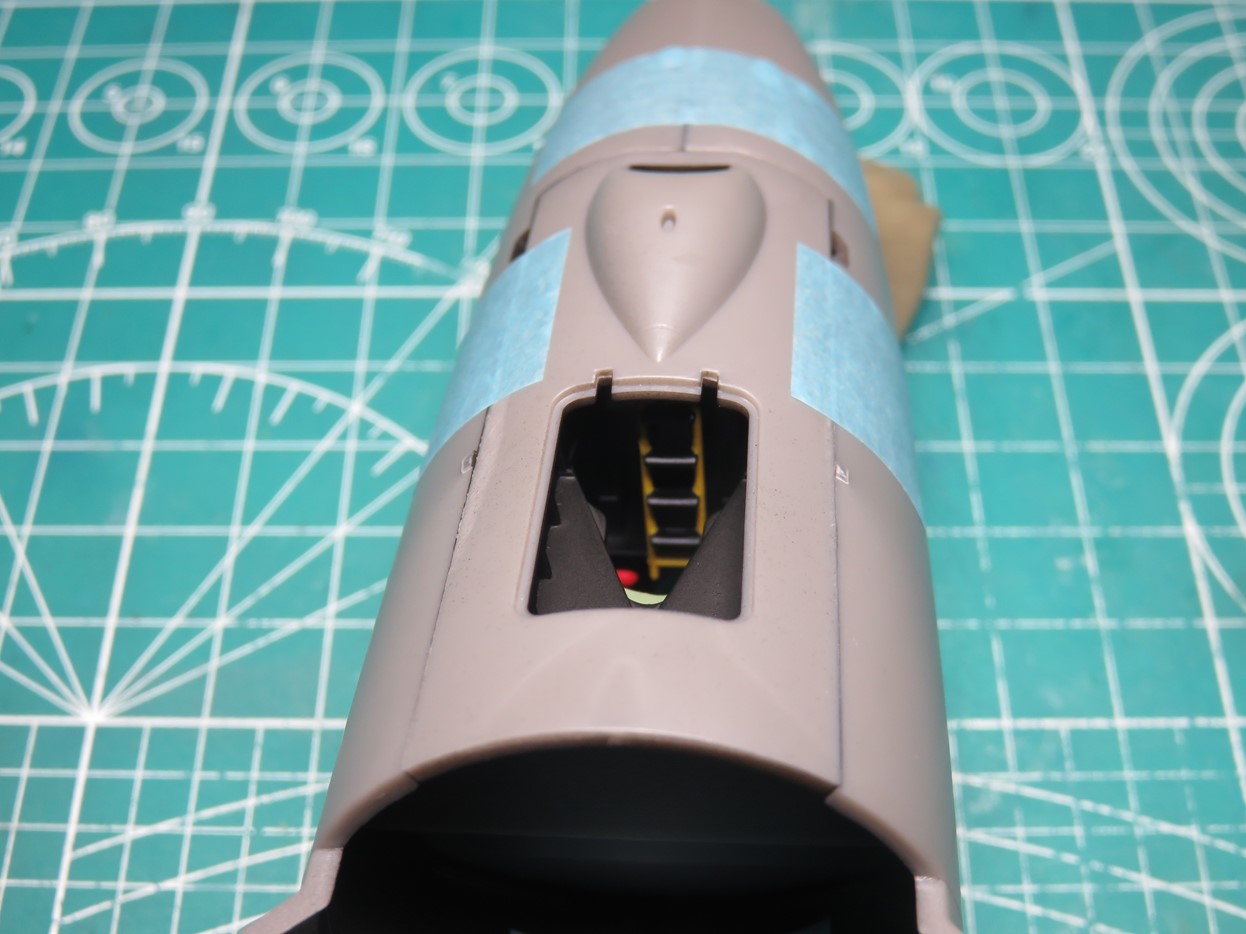
I also took this picture of the underside where the crew hatch is. You can see some details, but again it’s difficult due to the scale, and the black interior.
It’s a lot of fun to paint up all of these details, but if you are building this kit you might want to consider how much time you want to spend adding in all of these details, that will mostly be hidden. The good news is that the bomb bay is a lot bigger, and that will be a better place for you to dedicate time to painting tiny details.
But I still found all of this painting to be very fun and it was relaxing. It might seem like I’ve wasted my time, but I enjoy showing you the completed cockpit and now you can choose how much or little you would like to add to your Vulcan.
In the next stage, it will be time to add weight to the nose. And I like how Airfix designed this next section, but that will have to wait for next week.
To be continued…
Jared Demes is a modeler from southern Alberta. He has been building models since he was 4 years old when his Dad first introduced him to the hobby. He has written for several magazines including, Fine Scale Modeler, Scale Aircraft Modeling, Phoenix Scale Models, and others. He has an interest in all modeling subjects, with a focus on WWII Japanese aircraft and Science Fiction.
Jared has won several IPMS awards for his modeling, and currently operates his YouTube channel rebelsatcloudnine, where he showcases model builds and product demonstrations.