Revell HMCS Snowberry Flower Class Corvette
This is the thirteenth part of the Revell HMCS Snowberry Flower Class Corvette 1/144 Scale RVG 05132
I’ve had a bit of an unusual yet fascinating moment this week, which seems to occur with every long project I undertake. And that is when I reach a part in the build where I suddenly realize that I’m all out of parts, nearly completed the kit, and I can finally toss out the sprues.

It’s just an odd realization that I’m close to finishing a project. And it’s a feeling that I really find satisfying. As I cut out the last of the spare parts and threw away the empty sprues, I suddenly got more space on my desk, and I’ll sort of miss searching through each of the runners looking for the little parts.
It’s a sort of bittersweet moment, as I’m enjoying the project and I don’t want it to end. And at the same time, I can’t help but get excited thinking about what I can build next. But I’m not going to get too ahead of myself; we’ve still got things to do, and in this post, we’re going to rig up this ship!

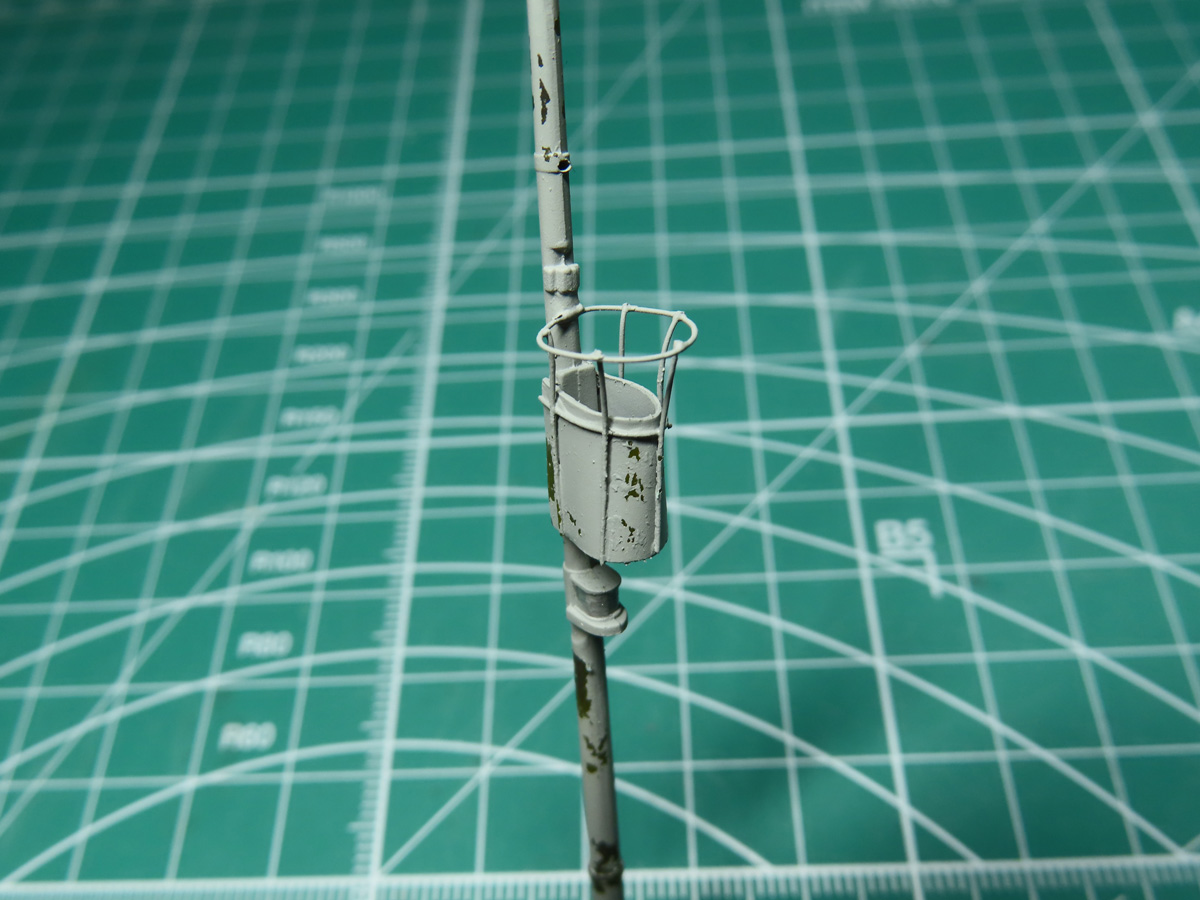
Staring with the main mast, I cut out and cleaned the crowsnest, and I wasn’t as pleased with this part as the side walls are incredibly thick and overscaled. So I took my Dremel tool and I tried to thin down the plastic, but I ended up damaging the part. I think this was for the best as I decided, instead of fixing the kit part, I’d instead try scratch building a new one.

I cut an oval out of some thicker Evergreen Styrene, and glued this to the bottom of the mast. This was going to be my new base for the crowsnest.
I then took some thinner styrene and glued it to one side of the mast with Mr Cement SP. After the glue had fully fused the styrenes together, I carefully wrapped the thin styrene around the base and added more Mr. Cement SP as I went along to ensure a tight bond.
There was a bit of resistance from the styrene, and I was concerned that it could open up and ruin all of that work. I took a lighter and carefully, and very slightly heated the plastic, and this helped it keep its new shape.
Once the glue had dried, all that was left to do was carefully trim away the excess plastic, and I now had a much nicer and more accurate crowsnest.

While researching the crowsnest on HMCS Sackville, I noticed that there was a metal hoop above and around the crowsnest. I think that this is a railing to help sailors climb in and out of the nest and onto the ladder behind the mast.
It’s a nice little detail, and using BSI CA Glue, I carefully added five thin wires around the bucket. I used the same 0.20mm wire as I had with the railings in the previous post. I kept them longer as it would be easier to trim away any excess wire rather than trying to deal with it being too short.

I then crafted a small hoop and glued this to the mast. After it was in place and had dried, I could take the longer wires and carefully bend them around the hoop. I added some more BSI CA glue to each of the points on the hoop, and I then carefully trimmed away the excess wire.
I’m very pleased with this extra detail, as I think it looks a lot nicer than the kit part. I coated the wire with Mr Metal Primer, and the mast was now completed.

For the masts yardarm, there are small squares at the bottom. These are to represent pulleys, and since the rigging would run through them, I carefully drilled out each section prior to painting. The reasons for this will be made clearer later on in this post.
I would also like to note that once the yardarm was painted, I came back and hand brushed each of the pulleys with Tamiya XF-1 Flat Black.

Moving back to the ship for a moment, I’ve got a few details to add that I missed from the previous post entry. I painted the chains for the anchors with Tamiya XF-56 Metallic Grey.
I’m still a bit undecided, but I’m thinking of adding on a wash to darken the chains up a bit, but I sort of like how the Metallic Grey contrasts with the winch and the grey deck.

The anchors on either side of the bow took a bit of extra effort to fit accurately. Pictures from HMCS Sackville confirmed that the anchors fit quite snugly next to the hull.
I had to trim the arm of the anchors to be the correct size and then carefully trim out the plastic around the oval opening, which would allow a more flush fit.

Moving to the back of the ship, I was test fitting the flag pole prior to painting, and I remembered the opened area and how I was considering adding some doors to cover the exposed area.
I fashioned the doors from some thin Evergreen styrene, scribed a line down the middle and then added 2 small bits of styrene as door handles. The part was then painted with Tamiya XF-78 Wooden Deck Tan, and then a coat of X-26 Clear Orange was applied.
I don’t know why that exposed doorway was bothering me, but I’m glad that I took the extra time to add in this door.
The last of the parts were painted as before with a base coat of Tamiya XF-84 Dark Iron. Then, a light layer of X-6 was applied to create rusting. Once the paint had thoroughly dried, I sponged on Mr. Masking Sol Neo and painted the parts XF-19 Sky Grey.
Now that the parts were all painted, I was ready to add them to the ship.

The mast was added first, and then the ladder was added behind it. To my annoyance, when I returned to the model, I noticed that the mast had shifted while drying and was now slightly crooked.
I decided to leave it as it was, as both the mast and ladder are quite fragile, and I didn’t want to risk breaking them. The yardarm was added last, and I now needed to leave the parts to fully dry overnight as I was going to apply a bit of pressure to the parts with the rigging.

The flag pole was added to the top of the engine room, and just bellow the light on the pole I drilled out a hole for the rigging to fit into.
I think that the flag will be one of the last things that I add to this model, as it could be the most fragile while I’m working and most likely to be damaged.

For the rigging, you can easily use the string that comes with the kit or even use thin wire.
But what if you are a bit of a clumsy modeler like me, whose big thumbs tend to get in the way?
Well, then you are going to want to use some elastic thread!
For this build, I’m going to use EZ Line as it’s the thickest thread I’ve got on hand. But there are a lot of other threads out there, including an excellent lineup from AK Interactive in their Elastic Rigging Bobbins series.
This stuff takes a bit of patience to get going, but it’s very nice to use and very forgiving.
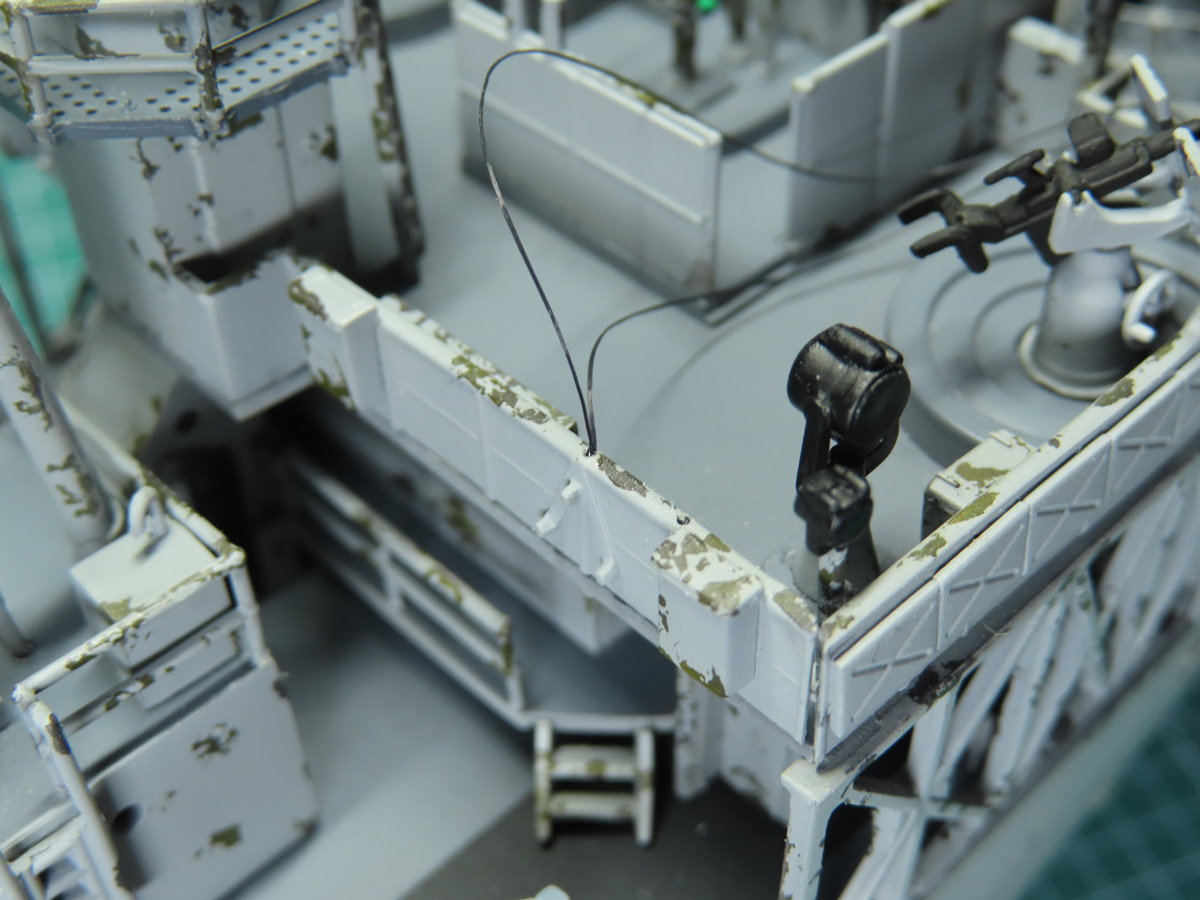
I’m starting at the railing on the back of the bridge. I carefully drilled out 4 small holes (2 on either side of the radar tower). And I’ve cut 2 long strips of the EZ Line.
I added a small drop of BSI CA glue into the hole, and then I placed the 2 strands of thread into the opening.
I do want to add that this elastic thread reacts very quickly to BSI CA glue and tends to stiffen up right away, so be careful that you don’t get glue anywhere else on the line.
Also, BSI CA glue is the best for this product. Styrene Cements and white/canopy glues won’t work with this product as we’re going to apply a bit of tension to the wires later on, and they need to be very secured.

After the BSI CA glue had dried, I threaded the EZ Line through the openings I drilled out on the yardarm. I found these small clothespins were just enough weight to pull on the line, creating just enough tension to keep the line straight.
I then applied a small drop of glue to the top of the pulleys and, using my Tamiya Sprue Cutters, clipped off the excess line.
This is more or less the process I used to add on all of the lines. Secure the EZ Line to one side, and then pull the line tighter and add more glue to the other side.
It’s a slow process, but thankfully, there isn’t a lot to rig on this kit.

Here, I’m demonstrating how easily the elastic thread can flex. Even with this fragile mast, this much tension on the lines didn’t move the mast around.
From what I can recall, this elastic thread was developed for railroad modelers on their power lines so that when they leaned over the layout, they didn’t damage their model.

I hope that this small demonstration with the elastic thread will give you enough to go on for your next project. It does have a bit of a learning curve to it, but once you figure out how the material works, you’ll soon be finding all sorts of places to add it to your models.
I first used it on a Wingnut Wings biplane, and it was such a relief to not have to worry about breaking the wire or threads as I had done in the past. Now, I mainly use it on my aircraft as antenna lines. I can easily handle the model, and the line will simply be pressed against the fuselage and then naturally return to its original shape.
Well, this is a sight. The HMCS Snowberry is, at long last, completed! In the next post, we’ll begin the process of weathering the ship, and I’m looking forward to that, though in hindsight, it might have been a bit easier if I didn’t add on all of the small details. Well, that’s just part of the challenge. Until next time.
To be continued…
Jared Demes is a modeler from southern Alberta. He has been building models since he was 4 years old when his Dad first introduced him to the hobby. He has written for several magazines including, Fine Scale Modeler, Scale Aircraft Modeling, Phoenix Scale Models, and others. He has an interest in all modeling subjects, with a focus on WWII Japanese aircraft and Science Fiction.
Jared has won several IPMS awards for his modeling, and currently operates his YouTube channel rebelsatcloudnine, where he showcases model builds and product demonstrations.
First Post: Part 1
Previous Post: Part 12
Next Post: