Airfix Avro Vulcan B.2 Black Buck
This is the sixth part of the Airfix Avro Vulcan B.2 Black Buck 1/72 Scale A12013 build and review.
This week there was a lot, and I really do mean a lot of work done. And the worst part, it was slow, and very tedious work. Lots of sanding, checking the sanding and more sanding. It’s part of the modeling process I personally enjoy the least, but it’s got to be done and it’s got to be done right.
And all of that sanding involved the long intakes, these are the Achilles heel of any Vulcan model kit, and I’m going to show you my process to sanding these down as smoothly as I could. And I’ve wanted to add the top wings for the past two posts, well, let’s see if we get that far this week.


I started by collecting some popsicle sticks. I know I have a large bag of these somewhere, but I couldn’t find them. So this meant that I had to gather them the old-fashioned way and eat the surrounding ice cream… I’m starting to suspect I lost that bag of sticks on purpose.
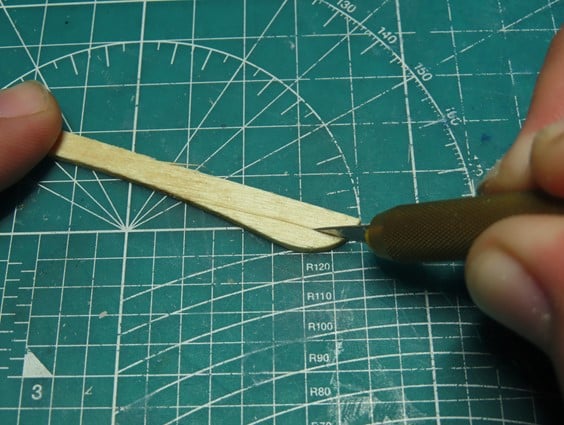
I cut the sticks in half, and then I trimmed one of the edges to be more squared off and blunt. I sanded the sides down so that there were no sharp parts that could potentially damage the putty while I was working.
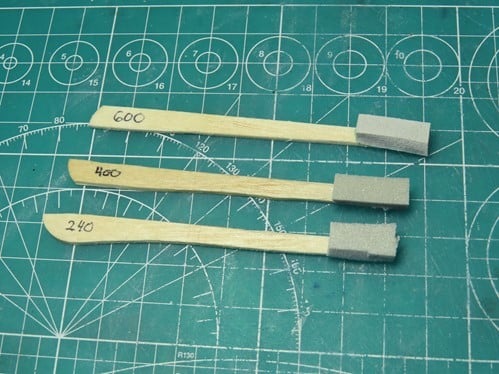
I created 3 sticks, and I glued Tamiya Sanding Sponges to the ends with BSI CA Glue or Mr Just Super Glue. I would start by sanding down the Mr Surfacer 500, with the 240 grit, to level the primer down a bit more to the surface. And then I’d move onto the 400 grit to smooth out the putty.
Lastly, I would use the 600 grit to smooth out the Mr Surfacer 500 and the plastic.

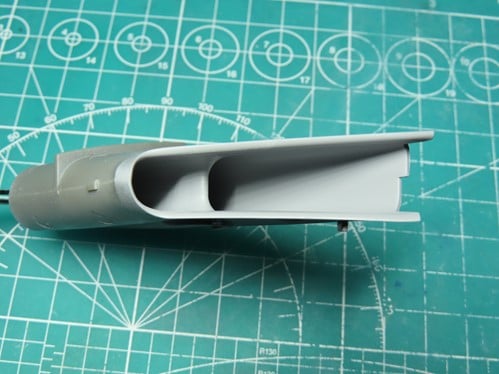
Here I’m using the 400 grit to sand down the side of the intake. The sponge allowed me to apply more pressure when I was sanding, and the sandpaper would in turn sand with conformity to the edges.
Sanding these intakes in general will take a while to complete, but gluing the Tamiya Sanding sponges to the sticks made this process a lot easier. And I was genuinely impressed with how smooth and clean the intakes eventually became.

At last, the intakes were finally sanded down and smoothed out, these were ready for a primer coating. But first, I washed the parts out with warm water to remove any dust that was left behind. You can see how messy my cutting mat is with all of that dust everywhere. Thankfully I keep a small vacuum next to my desk so the dust didn’t get all over my hobby desk. You can also still see the lines I carved where it will stay white. They are thinned down a bit from all of the sanding, but still visible enough for me to mask over.
I would like to state that these intakes are tough parts to work with. And I can understand why modelers are buying 3D printed aftermarket parts. I even looked for some STL files at one point as I was frustrated. The main frustration I encountered was in the middle sections where parts D37, and D38 are located. These parts are too tall and aren’t properly flush with the intake floors. These were really a struggle to sand around, and eventually, I decided that I had sanded enough and I just hoped that I had done my best.
I decided I would add a primer coat, to not only help with the adhesion of the white paint but also to fill in any small scratches that might have been left over from sanding.
I used my favourite primer, Mr Surfacer 1200, and I thinned it with Mr Levelling Thinner. Levelling Thinner has a retarder added into it, which helps slow down the drying process allowing the primer to level to a more smooth finish.
There is a drawback, and that is the tube shape of the intakes. When the primer is sprayed instead of laying down smoothly, the excess caught in the air will follow out the other side and will spin the paint around causing a rough build-up like sandpaper.
But there is an easy solution to fix this. Leave the primer (or paint) alone to properly dry out, and this is important. I then created one more sanding stick, this time I added Tamiya 1500 Sanding Sponge to the end and I slowly and carefully sanded away the rough paint, smoothing everything out for painting.
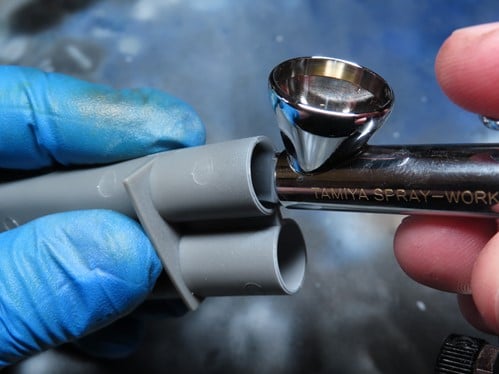
I took this picture to show how I was able to spray so far into the intakes. I loaded my airbrush with Tamiya XF-2 Flat White and some Mr. Levelling Thinner (70-30, Paint to Thinner). I would then insert my airbrush and slowly spray the white in very short bursts. I would then move on and spray the other areas of the intakes.
I layered on the Flat White in 3 coats, and I eventually built up a really nice bright white, and I was able to paint all of the intakes.

Once the paint had dried I sealed everything up with Mr Color 182 Flat Clear. This would help protect the paint when I began masking.
I’m really pleased with how these intakes have turned out. They are really smooth, and the white is nice and evenly coated.
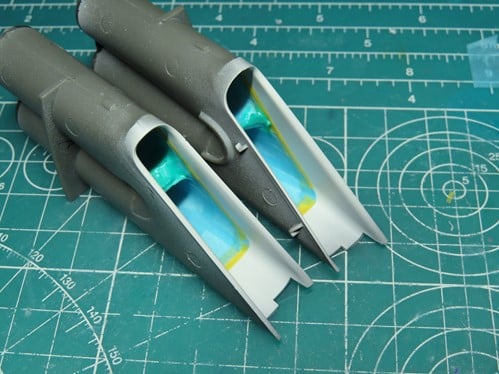
Masking the insides of the intakes was a challenge, but I had Tamiya 1.0mm, and 3.0mm tape, and this made things a lot easier. I followed along the lines that I had scribed in earlier, and after these parts are installed into the wings I’ll fill them in with cotton to prevent any paint from getting onto the white.
The separation of the white and the fuselage color is going to look really sharp when it’s finally time to unmask these sections, and I can’t wait to see it.

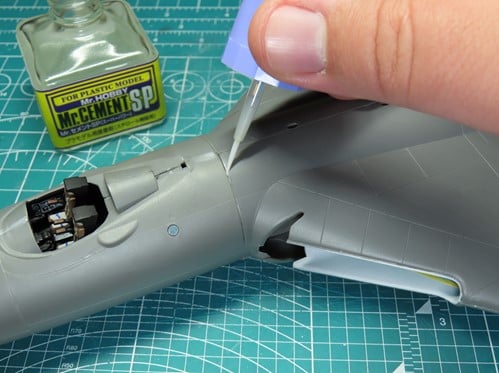
Because of the warping that had occurred earlier, I had a few fit issues getting the intakes flush with the wing edge. It took a bit of wiggling, but I got everything together, and then I clamped it down while the glue dried.

I glued on one side of the wing, according to the instructions you aren’t supposed to do it this way, but I mean they are more of a suggestion, right?
Either way, this was easier to glue Mr. Cement SP in smaller sections rather than dealing with the weight of both wings on top.

Once I had the other wing section glued on, I lifted the model and I was very surprised by how heavy this model had become. Thankfully the landing gear is really thick and will support the weight.
I was really excited to finally add on the nose section. Because of its round shape, this part has been rolling around my desk for a while now and I was worried that I might damage it.
I first glued it with Mr Cement, and then I added a very generous amount of Mr. Cement SP to really secure the nose to the fuselage. This could potentially be a weak spot as you will recall there is weight added in the nose. But I feel confident that these parts are fused together enough that they won’t ever separate.

Now that I’ve got this together, all I can say is WOW! This is one big plane, and I’m beyond happy to have the intakes completed and to at last have the top wings added.
I’ve got quite a bit of clean up sanding to do on the wing edges, and there’s some puttying that will need to be done on the spine, but that will begin next time.
At the moment I’m just going to appreciate the build so far, and I’m looking forward to finishing up more of the build so that I can begin painting, that’s another reason I’ve always wanted to build a Vulcan, they are a huge canvas that looks incredibly fun to paint.
To be continued…
Jared Demes is a modeler from southern Alberta. He has been building models since he was 4 years old when his Dad first introduced him to the hobby. He has written for several magazines including, Fine Scale Modeler, Scale Aircraft Modeling, Phoenix Scale Models, and others. He has an interest in all modeling subjects, with a focus on WWII Japanese aircraft and Science Fiction.
Jared has won several IPMS awards for his modeling, and currently operates his YouTube channel rebelsatcloudnine, where he showcases model builds and product demonstrations.