Airfix Avro Vulcan B.2 Black Buck
This is the fifth part of the Airfix Avro Vulcan B.2 Black Buck 1/72 Scale A12013 build and review.
Airfix included with this kit a set of raised landing gear doors so that you could pose this model in flight. They didn’t include any other directions on how to display it flying, but I must admit if it wasn’t for all of those bombs and that detailed bomb bay, I’d be very tempted to pose this model flying.
And even parked on the ground there is a lot of potential. You could pose the Vulcan with a full flight crew doing routine maintenance, or a fuel truck refuelling before a long flight with the crew getting ready to go. This is definitely the sort of model you could go all out on and steal the scene at a model show.


In the last post, I addressed the unfortunate warping that had occurred with the model. And this will be the first thing that I do to fix the model as the rest of the build will depend on these parts being straightened out for the upper sections of the wings to rest on as well as the placement of the nose section.
I used a hair dryer, and I slowly added heat to the section in between the intake edge and the forward landing gear bay. I would heat this up and then carefully pull the parts upwards to eventually correct the angle.
The plastic is pretty thick so I wasn’t worried about melting it, but this process did take longer to do than I had expected.
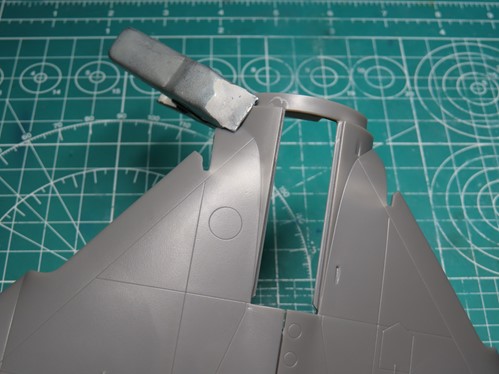
I wasn’t able to get it perfectly bent to the correct position, but I got it close enough. I clamped down on the parts and used a good amount of glue to secure everything together. I left the parts alone overnight to really dry out.
You can see some lighter grey marks from where I pulled up the plastic and stressed out the parts. I’m not concerned about these splitting apart in the future as when the nose section is placed over top it will permanently prevent them from breaking.
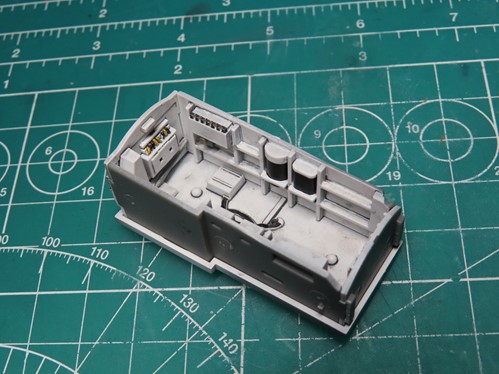
I glued together the forward landing gear bay, and I’m still really pleased with how all of the details Airfix incorporated into the build stand out. This is the sort of model I think I’d put over a mirror so that all of the details will be seen and appreciated.

I then glued the gear bay to the lower section of the wings. I used a good amount of Mr Cement SP to really fuse these sections together. This is a very crucial part of the model, and it was essential that I got that bend out of the lower wings. The forward landing gear bay is going to take on a lot of weight in the completed model.
It needs to hold the landing gear as well as take the weight of the nose section which as you recall I filled up with bits of lead. So far it feels really tough and secure, but I might come back to this section and add some superglue or reinforce the bottom edge with Evergreen styrene.

The left and right wheel bays were added, and they were thankfully a lot easier to add to the model. Some more Mr Cement SP was applied all around the edges for a tight bond.

To fill in the gaps from the previous post, I once again filled the gap with some thin styrene, and then carefully cut it flush with the fuselage. I added a bit of Tamiya Basic Type Putty to fill everything together.
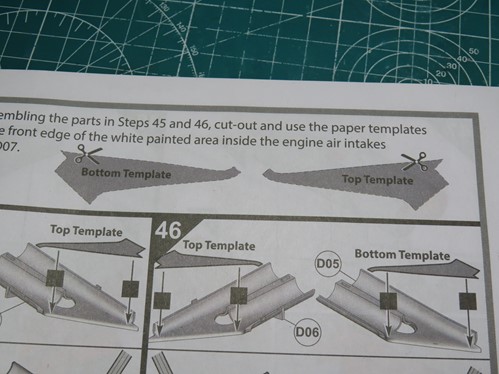
Now it was time to build the intakes, and I’ll admit this part of the build had me nervous. First, I scanned the top of the instructions. Airfix includes these guides so that you can mask off the part that needs to be white, and the fuselage color.

I took inspiration from the Tamiya 1/48 Scale F-14 kits, on those intakes there is a very faint raised line that allows you to easily see where the maskings need to go. I thought something similar might help me here.
I doubled the tape and placed it onto the template, and matched it into the correct position. I then took my hobby knife and I very carefully carved out a thin line following along the edge.

Here is the finished result, and I’m quite pleased with this. Once these sections are together masking will be difficult inside this cramped space, but with the different colors on either side, I doubt that this scribing will be noticeable.
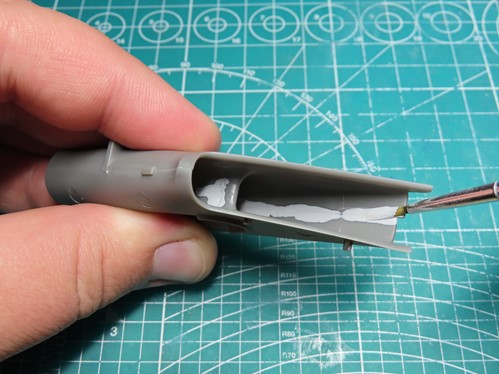
Despite my best efforts in gluing, there are some very noticeable gaps in the intakes. I could have used more Tamiya Putty, but that would have been difficult to add deeper into the parts.
I decided to use Mr Surfacer 500, as it’s a thicker primer that would fall in the gaps and I could sand it very smooth.
Unfortunately in some of the areas, mostly around the split section in the middle, I needed to apply a few more coats of the Mr Surfacer. This resulted in a delay in the drying time, so this was as far as I was able to get with working on the intakes.
I’d like the Surfacer to dry for a few more days as this will allow me to sand it down easier. This also means that this week I won’t be able to put the fuselage together.
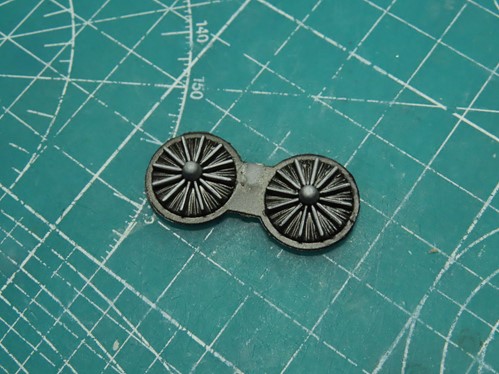
I was able to paint the turbines that would go inside the ducts. I first painted them with Tamiya XF-56 Metallic Grey, but that grey was just a bit too bright next to the silver. So I repainted them with Mr Color 28 Steel.
I then painted the raised sections with Mr. Color 8 Silver, and these colors better compliment each other, especially when you see them at the end of the intakes.

As I had thought I was going to be assembling the upper wings this week, I also painted in the rest of the bomb bay. I started with a coat of Mr. Surfacer 1200 primer and followed with a few coats of Tamiya XF-2 Flat White. Everything was then sealed together with Mr. Color 46 Clear Gloss.

Again I added a wash of Tamiya Panel Line Accent Color Dark Grey, and I couldn’t wait to to test fit the parts and just see how this bomb bay would eventually look. It’s always fun to see how that panel wash brings out the details.
I never really thought of how strangely complex the shape of the Avro Vulcan is until I built this model. You think it would be fairly simple, a giant delta wing, with a long nose and a tail. But it’s a lot more complex and sophisticated than that.
There are issues with the fit here and there, but I’ve really got to hand it to Airfix. They did the best they could and tried to simplify as much as possible with a very challenging subject.
And I think that once those intakes are sanded painted and masked over the really difficult work will be over and we can speed along with the rest of the build, and get to some painting, and I can’t wait to get some paint on this model. But we’ve still got just a bit further to go until then.
To be continued…
Jared Demes is a modeler from southern Alberta. He has been building models since he was 4 years old when his Dad first introduced him to the hobby. He has written for several magazines including, Fine Scale Modeler, Scale Aircraft Modeling, Phoenix Scale Models, and others. He has an interest in all modeling subjects, with a focus on WWII Japanese aircraft and Science Fiction.
Jared has won several IPMS awards for his modeling, and currently operates his YouTube channel rebelsatcloudnine, where he showcases model builds and product demonstrations.